
How to Maintain Your A/C (Because Now is the Perfect Time!)

The weather is finally starting to warm up! Now is the prime time of the year when people are shutting down their furnaces and rolling out their air conditioners in preparation for summer. Before you switch that A/C on though, think about the last time you maintained it; has it been a while? If so, now is a great time to properly maintain your A/C unit. Here are some steps you can take yourself.

Some notes before we get started

In this article we’ll mostly discuss how to maintain the most important parts of any air conditioner, regardless of its type. While caring for central A/C is vastly different from maintaining a window air conditioner (if you’re still stumped on the different types, then check out our past article on what you need to know), certain components are exactly the same throughout each system in order to function properly and create that cooling temperature you need throughout summer.

  1. Ensure the power is off before you start

Safety first! It’s dangerous to work around electricity as well as the moving parts within the air conditioner. To shut off the power from the outside, look for an exterior shut-off box near the unit. From indoors, you need to also switch off the power from the breaker box.

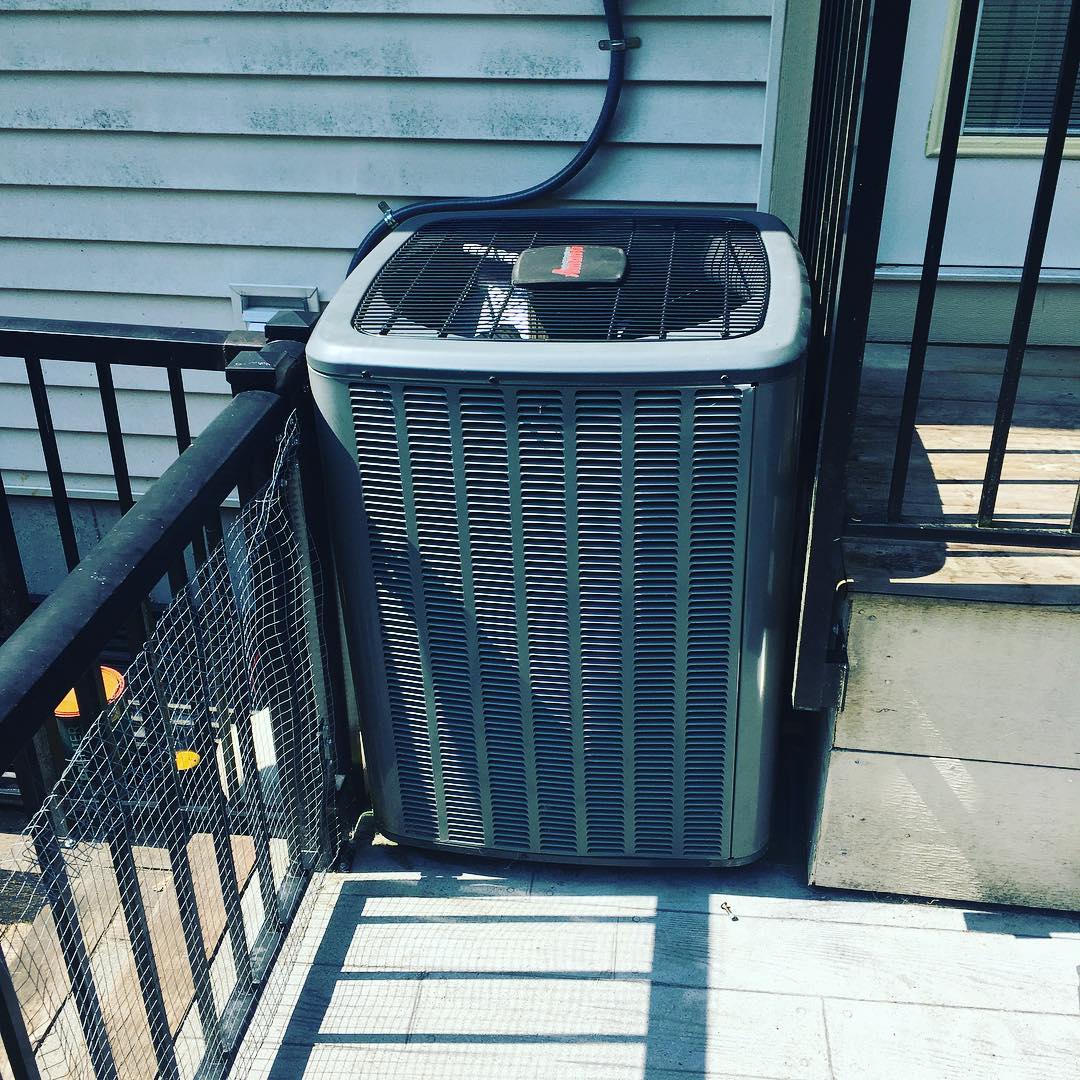
  1. Clean on and around the A/C unit

If you see any debris such as twigs or leaves on or near the unit’s exterior, remove this first. A lot of outdoor debris can accumulate from winter weather and it’s not a good idea leaving it alone. Give the unit some space! About 2 feet all around should do the trick.
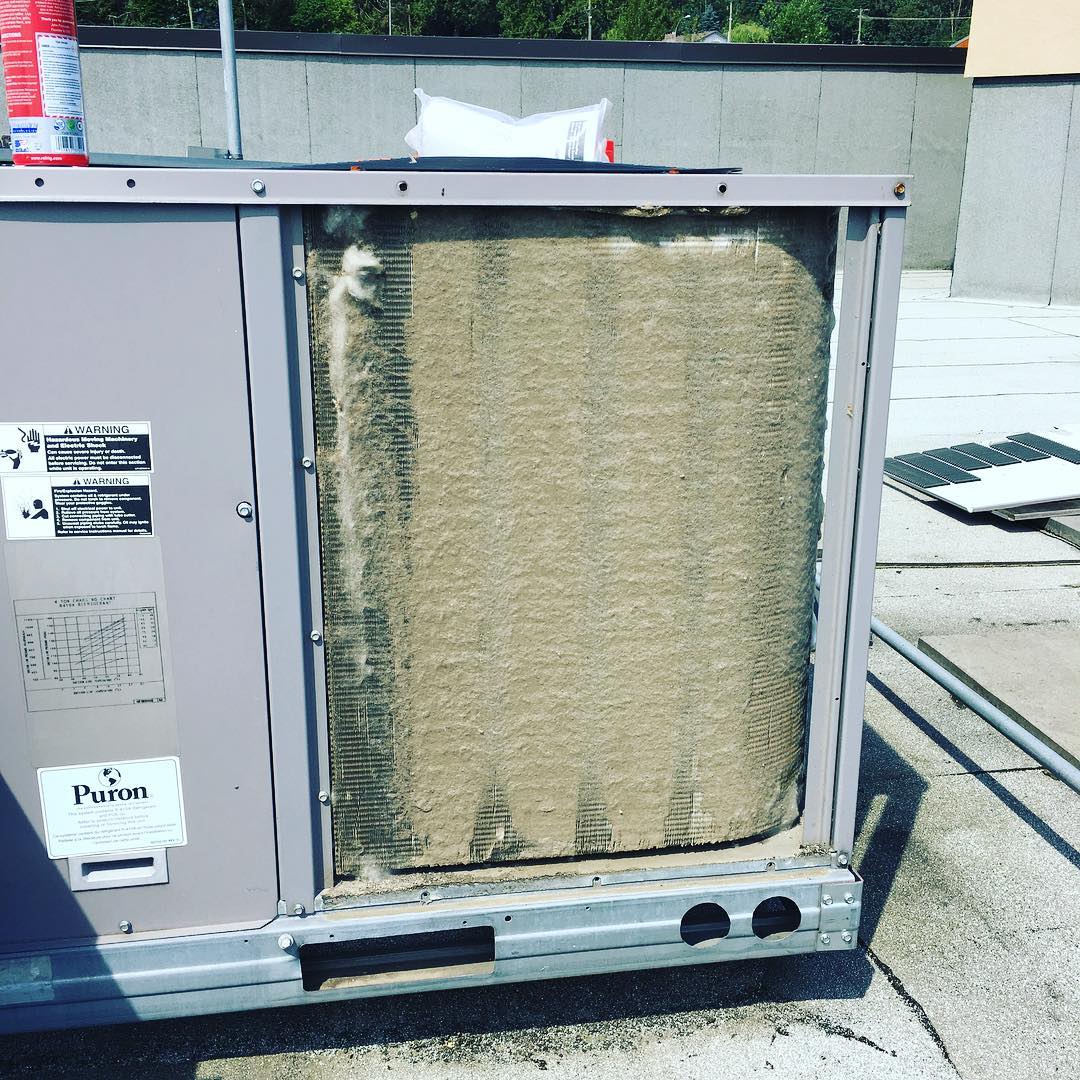
  1. Clean up the fins

These fins are built into every air conditioner’s evaporator and condenser to ensure there is proper airflow pumped out from these components. It’s a good idea to clean them up and to check to see if any fins are bent to make sure the unit is functioning normally. If there are bent fins, and you don’t feel like DIY’ing the task of straightening them out, you can always ask your HVAC technician to do it for you.

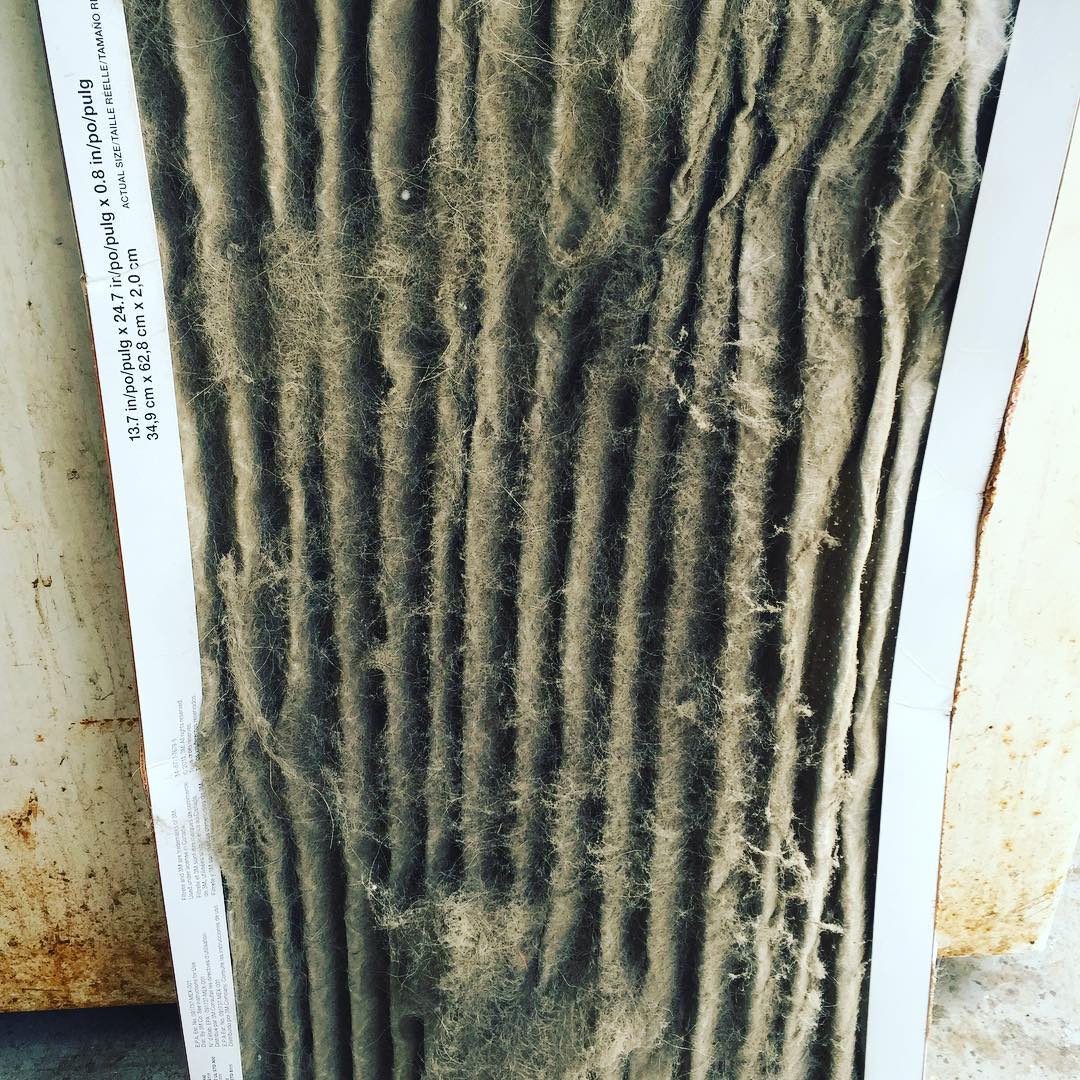
  1. Change the air filter

This is arguably the very best step you can take to maintain your A/C. Changing it once a month (yes, even in winter when it’s not being used!) is recommended, and thankfully it’s a very easy thing to do and the task can be done in a few minutes. Air filters left uncleaned will put excess strain on the A/C unit and also pollute the indoor air quality of your home.

  1. Check the evaporator coil

The evaporator coil is what helps absorb the heat in your home and cools it down, and it does this using refrigerant. Over time, dirt can insulate the coils which will reduce the amount of heat they can absorb, which in turn will force your A/C to work harder than it should to cool off your home. That’s why you need to keep the coils clean. There are a few ways to do it, but the best way to start is to follow our #2 tip in this article by clearing the outside area of any debris.

  1. Check the condensation drain as well

This is another important component of your air conditioner next to the evaporator coil, because the two parts work together to cool down air. In the drain’s case, it’s what allows condensation created within the A/C unit to drain outdoors. However, over time this can become clogged (especially if, for example, the thermostat is turned down too low) and thus block the draining process. That’s why you should check every so often to see if this is draining properly. If it’s not, you’ll need to either unclog the obstruction or call in your HVAC technician for help.

  1. Call a technician in case of emergencies

The reason we included this step is because anything could go wrong between numbers 1 through 6 of this article. You may detect one of the problems we’ve outlined such as a clogged condensation drain, for example, or the fins need to be straightened and you don’t have the tools to do it yourself. Or, maybe you just don’t have the time in your busy schedule to maintain your air conditioner, and you’d rather the job be done by professionals. Whatever the reason for it, scheduling an inspection by qualified technicians doesn’t hurt.

If you need an extra hand to maintain your air conditioner or it’s time for an inspection, then give us a call! At Rep-Air Heating And Cooling we provide our customers with many options that will best suit your needs from heating and cooling to refrigeration. Contact us today for your complimentary quote: 1-778-728-1476 or contact@repairheatingandcooling.com and don’t forget to take a look at our website: https://repairheatingandcooling.com. Follow us on Facebook and Instagram for free giveaways!

5 Signs It’s Time for a New A/C Unit

Winter is finally turning into spring, that special time of the year when everyone opens their windows to let in some fresh air. Depending on your hometown’s climate, it may already be warming up enough to feel like summer (temperatures can rise in parts of the Lower Mainland in BC even in April!). That means it’s time to switch on the A/C and let it do its thing…right?

If the air conditioning hasn’t been touched since last summer, hold that thought of switching it on now. Here’s why.

Examine your unit now and not later

By the time summer rolls around, it’s the busy season for us technicians. It’s a lot harder to schedule maintenance or a tune-up of your air conditioning, especially if you don’t switch it on until summer is in full swing and then realize something is wrong. Spring, on the other hand, is one of the low seasons for us, so there’s plenty of opportunity and time for us to tend to your HVAC needs, whatever they may be. So that’s why we insist that you examine your A/C unit now instead of later.

With that out of the way, let’s talk about the five biggest warning signs you should get new air conditioning.

Sign 1: Poor Airflow

Air that is hardly cooling the room down or it feels weakly distributed is one of the biggest telltale signs of an A/C unit in need of replacing. This usually occurs because of the unit’s compressor or ductwork. The compressor could be on its last legs, or there is something clogging the ductwork. Either way, this is the sign that needs to be addressed first if you identify it.

Just as bad as weak or no airflow is warm airflow. Your A/C should not be pumping out air that’s warm—that’s your furnace’s job. Warm air from the A/C usually means a problem with the compressor or that it’s low on refrigerant. These symptoms could also mean there is no cool air at all; both are a cause of concern.

Sign 2: Weird noises

Any working A/C should be running with minimal noise; a quiet hum is what you will most likely hear from a healthy unit. So any noises such as knocks, whines, loud hums (as in louder than per usual), and groans are a cause of concern—and depending on the cause, it’s a sign for new A/C. Otherwise, letting these noises carry on can lead to bigger, costlier jobs to install a new unit when it’s the summer months (not something we recommend).

Sign 3: Bad Smells

The indoor air after switching on your A/C should never produce a poor or unpleasant smell. If you do smell something such as burning or melting plastic, for example, or as if hair has caught on fire, or if there’s a foul smell you can’t pin down, it could have to do with your A/C unit.

Dust and grease may have accumulated too much around the compressor, or there’s a pollutant in the air ducts and ventilation that you can’t see (yep, all kinds of gross stuff can build up). Worst case if you smell burning, it can mean the electrical connections are shorting out or have shorted out. If that’s the smell, stop what you’re doing at once and turn off the A/C. Call in a professional and report the smell to them; they may be better able to understand the problem that caused it.

Sign 4: Leaks

No A/C should be leaking! Coolant is needed to help the condenser perform its cooling job properly. It may mean the condensation tray used to evaporate coolant and expel it into the air to lower the temperature could be overflowing. Moisture on top of the unit (i.e. it’s ‘sweating’) can also indicated a humidity issue.

Sign 5: It Constantly Runs

A perfectly sized A/C unit should never have to run constantly in order to perform its cooling job. If yours does, however, it usually means either the room is too big for your A/C or the unit itself is too small. It could also mean the unit is getting too old and needs to be replaced. An additional sign of air conditioning that’s too big or small to do a good job is if it runs for a bit, then shuts off—even though the room in question is still very warm.

Spring is a slow season for your HVAC technicians, so if you’ve noticed any of the above signs we’ve discussed in your A/C or you’ve decided it’s time to upgrade to a newer system, give us a call. At Rep-Air Heating And Cooling we provide our customers with many options that will best suit your needs from heating and cooling to refrigeration. Contact us today for your complimentary quote: 1-778-728-1476 or contact@repairheatingandcooling.com and don’t forget to take a look at our website: https://repairheatingandcooling.com. Follow us on Facebook and Instagram for free giveaways!

7 Spring Cleaning Tips for Your HVAC Units

It’s pretty much that time of the year again: spring cleaning season! Now that the weather is slowly but surely starting to warm up, it’s nearly time to shut off our furnaces and rev up the A/C right away…or is it?

Before you get excited about the warm weather, it’s time to get some spring cleaning done and out of the way. By doing so, it’ll be done and out of your way so you can go outside and get some fresh air! Here are some tips from us about how to spring clean your HVAC units.

Tip 1: Safety first!

Anytime you decide to clean your HVAC you must always make sure the power connecting to the unit is switched off. Check all power entrances and any separate fuses connecting to your units to determine if an electrical problem may be present (and if so, don’t do anything upon discovering it! Let professionals handle electrical components).

Use rubber gloves and if necessary masks when using cleaning products for exterior cleaning. You may want to wear a mask in case the dust build-up is really bad!

If you find certain components have worn down to the point of needing outright replacement, it’s best not to DIY installing the new part, especially if it’s an older system you’re cleaning. Your technician can do that for you, or if the system is too old for a single component replacement, they can install a brand new system which will save you money and time in the process.

Tip 2: The vacuum cleaner is your friend

We repeat: the vacuum cleaner is your friend. Well, unless you’re going outside, in which case the broom and rake are your next closest friends! Vacuum any dust bunnies, pet dander (if you have pets), dirt, or debris hanging out near your units. If you’re going to clean the air filters, have your vacuum cleaner on hand for that too.

If you have an outdoor HVAC system, sweep away all and any fallen leaves, dirt, and debris. While you’re at it, cut back all overgrown grass, bushes, and other plants so that they don’t touch or crowd the outdoor unit. Stick to the guideline of giving your outdoor heat pump at least 2 feet of space all around to prevent outdoor debris from harming the pumps.

Tip 3: Use these tools

In addition to the vacuum cleaner, broom, and rake, there are other tools you will want to have on hand for spring cleaning your HVAC. These tools include cleaning supplies such as warm water and soap, a scrub brush, a mop and mop bucket, and your HVAC units’ manuals. The latter item is especially important in the event you need to make a fix that’s easily DIY, or to determine whether or not it’s time to call in the professionals for help.

Another handy thing to have around are a toolbox in case you need to unscrew certain parts (such as getting in to check your air filter, if it’s attached to your unit as opposed to replaceable), a first aid kit (because you never just know—and, again, safety first), a flashlight, and insulation padding, scissors, and duct tape in the event your units’ insulation—usually the kind protecting its most delicate parts—is wearing thin.

Tip 4: Time to inspect

Now that the power to your units has been shut down and you’ve got your cleaning tools on hand, it’s time to inspect your units.

  • Turn on your air conditioner. Yes, we mean that. Give it a quick test run to see if you notice any issues arising such as weird noises or weak airflow. If so, now is the best time to call a technician before temperatures outside rise.
  • Check the furnace and A/C filters for any dirt and dust buildup. You will need to clean or replace these depending on the severity of the dirtiness buildup. After all, your furnace has probably been running all winter and collected all sorts of pollutants.
  • Check the plumbing for any issues with your hot water heater and connecting pipes.
  • Inspect the insulation covering your air ducts should there be any pieces wearing thin or need patching up.
  • Ensure the thermostat is working. Test it out for a few minutes with each unit. If it’s attached to an older system, perhaps it’s time to upgrade to a smart thermostat for better results in saving energy.

Tip 5: Clean or replace these specifically

  • Air filters. Again, check your furnace and A/C first.
  • The surface and interior of the air ventilation ducts. Many gross things have probably accumulated over the winter, and you can’t just climb inside to take a look. Hiring professional duct cleaning may be your best shot at ensuring your vents are clean.
  • Your A/C condenser. This is the most important component of the A/C unit that may or may need replacing.
  • The thermostat. A faulty one could be the reason why there’s a problem with your HVAC even though it’s been cleaned through and through.
  • The fan blades. This is more for your air conditioning, but it’s still a good idea to clean because the fan is what helps circulate cool air throughout the area. If it’s dirty, then the dirt will contaminate the indoor air.
  • Specifically the kind covering up the air vents connecting to your HVAC or that which is surrounding the unit’s more delicate components. You don’t want there to be any tears where air can leak out from.
  • The inside of your hot water heater. If this task seems daunting, don’t worry, we have an article on how to take care of that.

Tip 6: Clean up when you’re done

Things can get messy even when you’re cleaning your HVAC! Oil, gasoline, and even water (depending on which HVAC unit you’re tending to) could get spilled either while cleaning your units or refilling their fuel sources. Of course the most alarming mess to clean up is one created by a leak or a fracture somewhere either within or on the unit’s exterior. Get extra help from a technician if this is a mess you’ve discovered!

Tip 7: Your HVAC technician is your friend too!

Calling in the professionals for help, especially if you know you need to spring clean but you haven’t got the time in your busy work schedule, can be the exact thing you need. They can especially help with certain fixes that you shouldn’t do yourself, such as:

  • Pre-season tune-ups (before summer hits)
  • Preventive maintenance
  • Tightening up electrical connections
  • Lubricating moving parts
  • If necessary, replacing and installing old systems with newer models

Need some help with the more nitty-gritty details of cleaning and maintaining your HVAC units? Give us a call! At Rep-Air Heating And Cooling we provide our customers with many options that will best suit your needs from heating and cooling to refrigeration. Contact us today for your complimentary quote: 1-778-728-1476 or contact@repairheatingandcooling.com and don’t forget to take a look at our website: https://repairheatingandcooling.com. Follow us on Facebook and Instagram for free giveaways!

Tips on Keeping Your Furnace Room Well-Maintained

When it comes to your furnace, it’s not only maintenance and cleaning the unit itself you need to keep in mind. Where your furnace is located, what’s inside nearby, and how to move around—these all matter too. Today, we’re going to take a look at one of the next important furnace maintenance features everyone should be aware of: the room in which the furnace is kept.

Why?

For one simple reason: to make sure the state of your furnace isn’t presenting or present to any risk of flammability. The last thing we want to see happen is a home catch fire! That’s why not only should you venture into this room of your home more often, but also you should understand how best to keep this room as well maintained as the furnace itself. Educating our customers and ensuring their safety and satisfaction with their HVAC units matters to us the most!

Where should my furnace go?

There are a few options, if your furnace isn’t already installed in the home. The basement is one of the most common places, and for a few good reasons. Because HVAC units such as furnaces and hot water heaters are powered by natural gas or electricity, you need to ensure that your furnace has enough space for ventilation purposes. There also needs to be enough space so that repair work or maintenance by your HVAC technician can be completed.

Other potential rooms where a furnace could go (if for some reason the basement doesn’t work) are the garage, attic, confined closets, open spaces, or ground-floor utility rooms. Wherever you decide your furnace must go, you have to ensure that a professional technician is the one who installs it in the first place. DIY’ing your own HVAC installations is not recommended for some good reasons, many of which we discuss in our previous blog post.

Tips on maintaining a good furnace room

Keeping your furnace room clean and safe should be a priority. That means you should avoid putting any of the following objects in or near your furnace:

  • Laundry—specifically if they’re hung up against the furnace, or clotheslines are tied to your equipment. This is not only a fire hazard, but also a bad impact against the airflow and the unit’s ability to ventilate properly.
  • Kitty litter. The ammonia fumes that come from litter sometimes can circulate throughout your home and even impact airflow.
  • Cleaning or laundry products. Store these in airtight containers and in a place away from heat.
  • Gasoline, paint thinners, and paint. Plus, any other items considered to be combustible.
  • Used filters or old furnace parts. Depending on their state, they could also be fire hazards and space wasters.

If your furnace room doubles as a storage room, you absolutely have to make sure no cardboard boxes or plastic containers lean flush against the furnace either. Again, make sure a path is clear for your technician come maintenance day.

Be sure to bust out the vacuum cleaner regularly! Vacuum around the furnace and its burner compartment to prevent dust buildup.

As far as spacing goes, you should allow for at least 2 feet of clearance around your furnace. That way, in the event maintenance and repairs need to be made, your technician can do them easily. There should be nothing cluttering up accessibility to the air filter, vents, and even any other gas and electrical lines that may not be directly associated with the furnace, but they still are servicing other appliances within the same area.

Finally, make sure the manual for your furnace is within reach in the room where it’s hosted. That way, if something is wrong, you’ll be able to identify it more easily.

Want a professional’s keen eye to check on your furnace room, and even the furnace itself? Get in touch with us. At Rep-Air Heating And Cooling we provide our customers with many options that will best suit your needs from heating and cooling to refrigeration. Contact us today for your complimentary quote: 1-778-728-1476 or contact@repairheatingandcooling.com and don’t forget to take a look at our website: https://repairheatingandcooling.com. Follow us on Facebook and Instagram for free giveaways!

Mind-blowing Mistakes We’ve Seen with HVAC Installations

We’re not trying to point fingers at anybody in particular when we say this, but we have seen some pretty bad HVAC installations in our time at Rep-Air! We’ve gotten several phone calls asking for help and to many these mistakes may seem obvious to us, but it’s clear it wasn’t obvious to those who made the call.

These three mistakes we cover are some of the worst that we’ve seen (and that’s saying a lot!). Again, we’re not pointing any fingers to anybody in this article—we’re just going to show you what kinds of mistakes we’ve seen in the past, and hopefully you can learn from them in regards to your home’s HVAC.

Mistake 1: Not enough space

As we’ve mentioned in our post regarding this unbelievable installation job, the type of workmanship we see daily for HVAC installations is mind-blowing.

The lack of knowledge about the function of how an A/C system works is very apparent, and what’s worse is the customer paid thousands of dollars to have it installed the way it is in this picture. A minimum clearance of 24 inches between a wall and any obstruction is a manufacture’s spec on most models.

Mistake 2: Obstructions

Some of the objects you wouldn’t think could harm your HVAC unit in fact can! Never, ever let plastic items lean up against the heat exchange component of your furnace, for example in the case of this recycling bag’s unfortunate demise. Thankfully it was cleaned up swiftly upon discovery.

Other obstructions such as the garden hose, trees, bushes, and even patio furniture should never be placed up against or in the way of your heat pumps or central A/C outdoor units. Like we said, give them some space!

Mistake 3: Lack of cleaning or maintenance

Now this mistake is the most common one, but we’ve seen some horrific examples of cooling jobs gone untouched from cleaning for 5 years straight such as this one.

And if you’re a pet owner, filter cleaning for your HVAC units needs to take place more often, otherwise yours could look like this.

All of these mistakes may seem very obvious to some, but it’s clear to us that that’s not the case at all for most. Hopefully by checking out these mistakes, you’ll know when and if it’s time to call in the professionals for help! At Rep-Air Heating And Cooling we provide our customers with many options that will best suit your needs from heating and cooling to refrigeration. Contact us today for your complimentary quote: 1-778-728-1476 or contact@repairheatingandcooling.com and don’t forget to take a look at our website: https://repairheatingandcooling.com. Follow us on Facebook and Instagram for free giveaways!

How to Choose the Best A/C for Your Home

You may not realize it given the cold temperatures outside, but now is actually a great time to start thinking about your home’s A/C. Why? Because winter is the high season for furnace maintenance and repairs, but it’s a low season for air conditioning—early spring, too, is a great time because that’s a less busy time of the year for us technicians to install new equipment.

If this is the year you finally have had enough of living with the heat using only a fan to cool you down, then now is a good time to start getting A/C! Here are some of our tips on how you can best choose the new air conditioning for your home.

Types of A/C

There are several types of air conditioning that can be installed in a home, but choosing the right one is what will really matter at the end of the day. These are the most common units that are worth considering:

Central: this is the most commonly installed form of A/C in homes, and many homes already come pre-built with central. These systems use refrigeration technology (yes, just like your fridge) to cool the air down. It does this using the following identical components: a condenser unit, an evaporator coil, an air-handling unit with a blower and fan, and its own unique system of ductwork so it can exchange room air with chilled air. The condenser sits outdoors while the air handler is usually located in the garage, attic, or basement, with ductwork routed through the attic or basement and the walls throughout the house.

Heat Pumps: these are a certain variable of central air conditioning. The difference between the heat pump and regular central A/C is that you can reverse the settings so that it heats up your home in the winter as well as cool it down in the summer.

Ductless, Mini Split: these A/C units are more commonly used for homes that have been retrofitted. They’re better suited for homeowners who’d rather cool one or more individual rooms rather than the entire building. Each zone with a designated part of the unit comes with its own thermostat.

Portable: this is a more useful air conditioning unit if you live in a small home, apartment, or condo and only need to cool the most heavily used rooms such as the bedroom or kitchen. The most common types of portable A/C units are now built with wheels so you can shift them into different rooms depending on the time of day they’re needed most.

Window: window A/C units still exist, and to some they are an affordable choice and easy to install. These units can be placed outside of the living space, which is appealing to homeowners who’d rather reduce the clutter in their home. Depending on the BTU rating, a window A/C unit may even prove to be more energy efficient than a portable unit (remember, the higher the BTU rating, the bigger the room that the unit can cool down).

How to determine which A/C type is right for you

  • Consider the size of your building. If you live in a smaller home, or you live alone or with only your pets and/or your significant other, you don’t want to go overboard with installing an A/C unit that’s too big or too small for the job. If it’s a larger house, and there are a lot of people who live there, then you’re not going to be satisfied with a small window or portable A/C unit.
  • Where you live matters too. If the climate is sweltering hot every summer (you face the mountains, for example), or your home tends to have moisture issues, cooling can help reduce the amount of excess moisture as well as keep your body temperature at a healthy level when the summer months roll around. If your home was built pre-1980, that matters as well; the older the house is, the more complicated the installation process for a new A/C is (but it also means it’s more important; see our past blog post for more details!).
  • Pay attention to the unit’s SEER, or Seasonal Energy Efficiency Rating. Every unit comes built with this rating and it’s very important to pay attention to this. The higher the SEER is, the more energy efficient it is and the less it will cost you to provide cooling to your home.
  • In addition to the SEER rating, many manufacturers have added extra components to make A/C units more energy efficient. Look for features such as large coils, a filter indicator light, a high temperature rating (EER) above 11.6 percent, a variable-speed blower, and a fan-only switch and/or an automatic delay fan switch. Many of these can be found in the latest units made to date.

Recommendations for Specific Questions

You will need to answer the following questions for certain when choosing the best A/C:

  • Do you want your whole home cooled down? If so, central A/C or a heat pump are your best choice.
  • Do you want heating and cooling? If so, the best choices are the heat pump or a ductless air conditioner with a built-in heating feature.
  • Are there any ducts in your home, or none at all? If there are ducts, go with central A/C or heat pumps. If there are no ducts, a ductless air conditioner is your best choice.
  • Do you want cooling but only in specific areas? If so, either go with portable, window, or even ductless air conditioning.
  • Do you want to keep your energy costs to a minimum? If so, heat pumps are the way to go.

Now that you know better about what kind of A/C should be in your home, get it installed (or, if necessary, maintained) by real professionals! At Rep-Air Heating And Cooling we provide our customers with many options that will best suit your needs from heating and cooling to refrigeration. Contact us today for your complimentary quote: 1-778-728-1476 or contact@repairheatingandcooling.com and don’t forget to take a look at our website: https://repairheatingandcooling.com. Follow us on Facebook and Instagram for free giveaways!

The Pros and Cons of Owning a Gas Fireplace

Whether you already own one or are considering a new installation, having a gas fireplace in your home, especially during this chilly time of the year, has its perks.

You may be wondering why, or whether you should settle for an electric or classic wood-burning fireplace instead (provided you have a large enough home to support the usage of one). Let us explain the varying pros and cons of owning a gas fireplace to you so you can make an informed decision.

Pros

  • Cheaper than electric fireplaces. Not only are electric ones purely made for decoration, but also you’re paying extra for only a simulation of a fire, i.e. there’s no heat to the flame. Today’s gas fireplaces
  • Fewer safety risks. Gas fireplaces (specifically direct-vent units) draw in the air from outside to keep the fire going, and they exhaust all the water vapour and combustion gases by burning the gas.
  • Easier to hire a professional for. We offer gas fitting for these types of fireplaces, as well as any outdoor barbecues and utilities that use natural gas.
  • Convenient to use. All that’s needed to turn on and off a gas fireplace is a switch. Yes, that’s it!
  • Cleaner air. Gas fireplaces don’t require wood for fuel, meaning less smoke is created and our air is kept clean and fresh.

Cons

  • Sealed glass. While this part is a necessary component to a safe fireplace, it is inconvenient for people who truly enjoy the feel of heat on their skin.
  • Smaller flame. Again, if you really love sitting in front of the fire to keep warm, a gas fireplace’s flame is smaller than that of a wood burning one or even an electric one, depending on its size.
  • Less picturesque. This con is based mostly on personal preference, but it is a big one for some, so that’s why we’re including it. The advantage of a wood-burning fireplace is that it really gives off the sounds, smells, and heat we’ve all come to expect from fire, which can make us feel cozy and warm. A gas fireplace’s flames tend to be blue (the hottest type of flame), but it doesn’t leave you with that homey or even nostalgic experience quite the same way a wood fire does.
  • The logs’ position can’t be changed. Some people prefer the ability to change the position of the ceramic logs in a fireplace, but this is a bad idea especially if your gas fireplace is a direct vent one. If the logs’ position and look is changed, incomplete combustion can and will occur.
  • Professional maintenance is required. While not entirely a downside, a gas fireplace does need professional maintenance more so than a wood-burning one. Wood-burning fireplaces are easier to clean, while gas ones require annual service in order to ensure top performance.

Now that you’ve thought the ups and downs over, do you need professional gas fitting service for a new fireplace? Let us know. At Rep-Air Heating And Cooling we provide our customers with many options that will best suit your needs from heating and cooling to refrigeration. Contact us today for your complimentary quote: 1-778-728-1476 or contact@repairheatingandcooling.com and don’t forget to take a look at our website: https://repairheatingandcooling.com. Follow us on Facebook and Instagram for free giveaways!

5 Signs Your Gas Fireplace Needs Professional Maintenance

There’s nothing quite like staying warm and comfortable in the middle of a cold winter’s day. That’s why having a fireplace in your home can help. Add a cup of hot chocolate and you’ve got a cozy evening.

That being said, if you don’t check up on your fireplace often enough—especially if it’s a gas fireplace, which we’ll focus on in this article—you could be looking at some trouble down the road. Here are the biggest signs your home’s fireplace needs maintenance as soon as possible (and in some cases, the sooner the better!).

1: Pilot light issues

Just as if you would use a gas furnace, there’s a pilot light built into your gas fireplace as well. Your gas fireplace’s manufacturer should have instructions for you about how to troubleshoot the pilot light if something goes wrong, but if your pilot light refuses to stay lit, even after following the instructions, that’s one sign of something gone very wrong.

Usually the cause is due to a broken or worn out thermopile, which is a component that does need to be replaced occasionally. Another more serious cause is faulty wiring, which you should not attempt to fix by yourself. If your pilot light won’t stay lit and you’ve already followed the manufacturing instructions to no avail, calling a professional for help is the only best solution.

2: A rotten egg smell

Anything that smells like rotten eggs means danger! If you hear a hissing sound or see anything else out of the ordinary, it means there’s a gas leak. The only reason you can smell anything is because of mercaptan, a harmless chemical added to natural gas which gives it its rotten egg or hydrogen sulfide smell.

If you see, hear, or smell any signs of a gas leak, stop what you’re doing immediately and evacuate your home. Don’t attempt to fix it yourself, or call about the leak on your cell while you’re in the house, or smoke, or light matches or even operate any light switches. Go outside ASAP, and call 911 or you can call Fortis BC’s 24-hour emergency line at 1-800-663-9911.

3: Too much soot

Unlike wood-burning fireplaces, soot buildup is not a sign of a healthy gas fireplace. In fact, it means something is very wrong, especially if there’s soot on the glass doors. It’s either because of the logs, the interior of the fireplace, or the outside venting (or maybe all of the above) contain buildup. However you look at it, if soot is what you’re seeing right now, then your fireplace needs professional attention immediately.

4: It switches on and off

This is one of the most frustrating common signs of a gas fireplace malfunctioning, and it is also the most difficult to solve without a professional technician’s help. Multiple causes can be the culprit as to this scenario:

  • The millivolt generator, usually placed in the path of the pilot light and the size of a AA battery, is old and worn out
  • Dirt and carbon have built up in the vicinity of the pilot light
  • Too much of a breeze is coming down the chimney, and the doors are open
  • There’s a jamming issue with the burner
  • A bad thermocouple or thermopile—the thermocouple being the sensor that senses heat and allows the pilot light to stay lit, while the thermopile allows gas to pass through the burner system and heat and light

Whatever the cause, this is another one where you shouldn’t DIY the fix yourself. Call in a professional.

5: Wear and tear

Just like your furnace and A/C, your gas fireplace is considered to be a mechanical unit and therefore it needs regular maintenance just like every HVAC system out there. Components can and will wear out, especially when you operate the fireplace between periods of no use at all to very high use in the span of a year.

Valve and gas connections are where the most dangerous leaks can occur. The thermocouple and thermopile should both be regularly cleaned, as should the ceramic logs that usually come with a gas fireplace. The logs should be placed properly in order to allow the fireplace to work at its best too. Never neglect to look after your gas fireplace, because that’s where some of the most frightening accidents and tragedies can occur, including explosions and fires if a component malfunctions or leaks, meaning house fires and serious injuries can happen.

In any event that these problems may arise, the safest thing you can do is to turn off the gas fireplace and call a professional for assistance. The last thing we want to find out is that you’ve put yourself and your home and family at great risk!

Do you need fireplace maintenance done? Does your gas fireplace need a tune-up or specific maintenance performed? Let us know—HVAC is not our only qualified service! We offer gas fitting and fireplace services too. At Rep-Air Heating And Cooling we provide our customers with many options that will best suit your needs from heating and cooling to refrigeration. Contact us today for your complimentary quote: 1-778-728-1476 or contact@repairheatingandcooling.com and don’t forget to take a look at our website: https://repairheatingandcooling.com. Follow us on Facebook and Instagram for free giveaways!

5 Signs You Should Get a New Commercial Fridge

A commercial refrigerator or refrigerators is the backbone of every restaurant, grocery store, and corner store. So much of their inventories are either chilled or frozen and must stay at a cold temperature, so business owners need to depend on their fridges to keep their products preserved and their customers safe.

If a commercial fridge shows any of the following signs of malfunctioning or age, now may be a good time to consider upgrading the fridge to a more modern one. These are five of the most telling signs that your fridge may need an outright replacement rather than a regular repair job in order to function at its best.

Sign 1: It looks like snow…on the inside

Frost buildup inside of a fridge definitely means something is wrong, especially with your fridge’s ability to cool down a fridge. In this case, it’s cooling way down, more so than it really should. Frost can usually build up when a door is not properly closed or the seal is torn, forcing the compressor to work harder than usual to cool down the inside of the fridge. A more likely cause, however, is the defrost function not working properly.

However you look at it, it should not look like it’s about to snow inside of the fridge, and the cause is too complex for a simple DIY fix. Calling in a professional as soon as frost is discovered (if it’s discovered) is highly recommended.

Sign 2: It’s warm…too warm

One of the most common signs a commercial fridge is going to have to be replaced is when it has difficulty with maintaining a consistent cold internal temperature. A healthy refrigerator should be able to keep its contents chilled between 2 and 3 degrees Celsius (36 and 38 degrees Fahrenheit). Any temperature fluctuation will indicate that there’s a problem for your technician to look at, especially if that unit is struggling to keep its temperature below 2 degrees.

A too-warm environment is usually caused by a flaw in the seal, such as damaged panel joints, a faulty door gasket, or a worn out hinge or two. This can cause cold air to escape from the fridge and thus demand the compressor to work harder than usual to keep internal temperature going, which in turns drives up your energy bills. Heat can also mean that dust has built up on top of the condensers, which while fixable may also be a cause of concern if maintenance hasn’t been performed regularly enough.

Sign 3: What’s that smell?

The first thing we know that nobody wants to discover while they’re shopping is food that smells really, really off. You should never smell food that’s spoiled when you’re taking it out of the fridge, especially when it’s not even close to the expiration date stamped on it. Spoiled food is yet another sign of a fridge on the brink of breakdown. It means something is most definitely wrong with the fridge’s cooling process.

What’s the second thing, you’re wondering? Higher than usual energy bills in your mailbox or inbox (depending on how you receive your bills these days). Again, it could be your fridge’s fault, especially if it can’t keep up with maintaining a cool temperature, because when it does so it’s also draining energy.

Sign 4: There’s a leak…and another one…and another one!

Any leak from the fridge is a cause for concern! If you or, even worse, your customers discover a pool of water surrounding or leaking out onto the floor in front of the fridge, there are a couple reasons why. The most fixable reasons are that the evaporation pan is full, the drainage hose is clogged, or the gasket needs to be replaced.

A leak could also be coming from an old or damaged seal on the door, or it means your walk-in cooler was poorly installed in the first place, both of which are more serious situations. Either way, leaving any water puddles untreated is not something we recommend at all, because it will lead to mildew and mold buildup—something your health inspector is going to be very unhappy about.

Leaks may also not be leaks at all, but rather a sweaty fridge. Condensation, while not as alarming, is still another red flag that you cannot afford to ignore. Moisture can accumulate on the outside if the door is not shut properly or if the sealing or gaskets have been damaged. If condensation is appearing on the inside, it means something is wrong with the temperature setting, which if left alone can lead to sign 3 that we just described: spoiled food.

Sign 5: It’s repaired often, making it less efficient

There’s a reason we as technicians do insist that you replace a unit outright over constant repairs, especially if the commercial fridge in question is older than ten or fifteen years plus it hasn’t been properly maintained or cleaned since.

Some fridges that are older than 15 years of use may last up to 20 if they’re really well taken care of. However, if you’ve decided to add repair job after repair job over and over since you first installed the fridge, that’s a more concerning issue because, as we already stated, if it’s been repaired constantly then its efficiency becomes less than it was originally. Put a stop to frequent repair jobs if your fridge keeps breaking down and get a new one instead; it may cost you more money at first, but the savings will benefit your business for years to come.

Need a new commercial fridge installed or repaired? Give us a call! At Rep-Air Heating And Cooling we provide our customers with many options that will best suit your needs from heating and cooling to refrigeration. Contact us today for your complimentary quote: 1-778-728-1476 or contact@repairheatingandcooling.com and don’t forget to take a look at our website: https://repairheatingandcooling.com. Follow us on Facebook and Instagram for free giveaways!

5 Things to Consider Before Replacing Your HVAC System

It’s great to feel comfortable in your home throughout all four seasons of the year. That’s why we know you rely on your HVAC systems so much. The highest quality system can last between ten to twenty years, but just like everything in life, there comes a time when it gets old, wears out, and starts to fail.

At this point, you may be browsing online and shopping for a new system, but the truth of the matter is getting a new system is not as straightforward as you think. With that in mind, here are five things you really need to consider before you go and replace your current HVAC system (and also way before you start shopping for one!).

  1. The Type of Heating or Cooling System

We’ve mentioned this before, but there is more than one type of heating and cooling system to consider before you go and replace your current one. For example, are you looking to replace your portable one? If so, have you looked at the possibility of adding centralized heating and cooling instead? Depending on where you live, what kind of home you live in, your financial situation, and your personal level of comfortable temperature, the type of system you’re looking to replace should be considered first and foremost.

If you’re renting as opposed to owning your property, then a centralized system is something you don’t need to worry about (you may want to bring it up with your landlord, though, if the temperature doesn’t seem right or normal). If you own your property, then you may want to invest in central A/C and heating so that the temperature is comfortable and in your control at all times.

  1. Size

Not only does the size of your home need to be considered, but also the size of the system you need for maximum comfort in temperature matters. You need to figure out the dimensions of your home as well as the frequency of use applied to your systems. Otherwise, you may end up buying a system that’s either too big and frequently shuts on and off, or too small and ends up overused and requiring more repairs sooner than you intended.

Don’t feel too badly if it takes a while to find the right size system either. It’s really for the best that you don’t settle on the first big or small system you see. If you need any assistance getting dimensions and other measurements sorted out, you can always ask your technician to take a look; sizing things up is part of their job.

  1. Quality

It can be easy to settle on the cheapest system for your home, but hold that thought! Just because it’s cheap does not mean it’s of good quality (a rule of thumb that applies to everything in life!). Sure, the higher quality systems can be expensive, but in actuality you’ll be saving money down the road.

Be sure to check the branding of the system also, as their reputations can also impact the quality of the system. Be sure the brand offering the system has a good reputation and really do your homework for the sake of reliability assurance. Asking your HVAC technician about the different brands can help too!

  1. Features

Almost all of the latest models of HVAC come with brand new features your old system probably doesn’t have. Programmable thermostats are one; timers are another. Some other really cool features that can be found in most new systems in the market are comfort zoning, automation, and even smartphone connection.

You also need to consider whether the filter in the latest system can be removed for cleaning or not (if so, great—that will make maintenance on your part much easier). Really look at each system’s components and not just the price tag. If it looks like cleaning and maintenance will be too much of a hassle for you, then it’s probably not worth buying.

  1. Ductwork

Like your system, the ducts in your home probably need to be replaced, or at the very least inspected by your HVAC technician. This should especially be done if it’s been years since you first installed the ductwork; like your HVAC, these ducts can experience wear and tear due to the continuous exposure to heat and humidity.

It can also, to some homeowners’ surprise, be the very reason why their HVAC system isn’t working at its fullest capacity. Any ductwork including insulation that’s been poorly applied or is wearing thin or has holes and gaps can create considerable heat loss. Therefore, it’s a good idea to ask your technician to check on the ductwork and ensure it’s in good health before you buy a whole new system.

Need help getting your new system installed? Want to check on the old system before replacing it? Or do you need advice from a technician in general? Whatever your HVAC needs, we’re here to help! At Rep-Air Heating And Cooling we provide our customers with many options that will best suit your needs from heating and cooling to refrigeration. Contact us today for your complimentary quote: 1-778-728-1476 or contact@repairheatingandcooling.com and don’t forget to take a look at our website: https://repairheatingandcooling.com. Follow us on Facebook and Instagram for free giveaways!